


This is a in-depth guide on disabling CPU boost to lower tempatures
What Does Disabling the CPU Boost Do?
It’ll lower the overall CPU temperature. Given BIOS update 322 made the fans kick in at higher temperatures, this may allow for a slightly lower fan rpm.
Step 1: Open Registry Edit
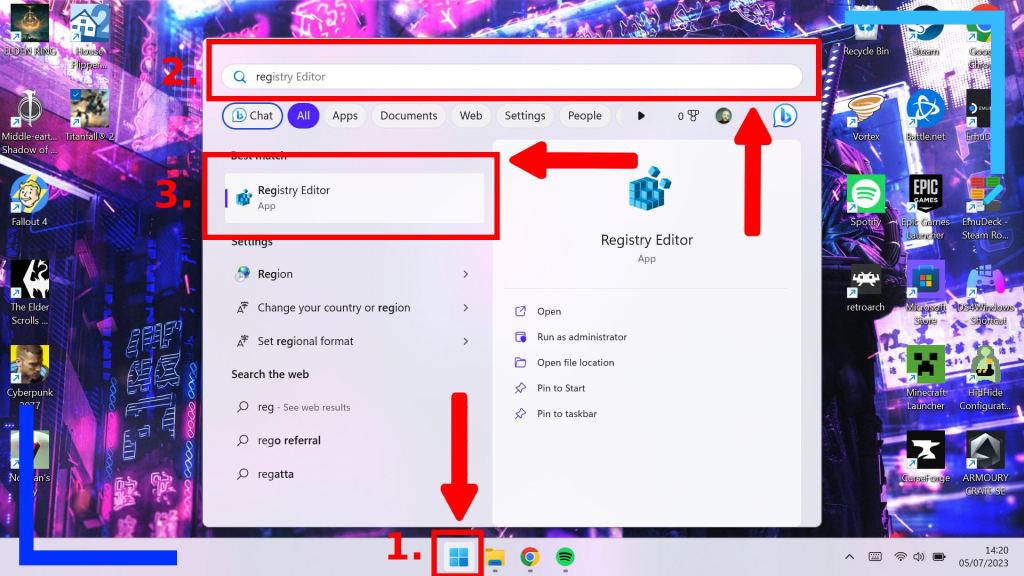
The first thing we need to do is open up Registry Edit. To do this, click on the Windows icon (1.), then in the search bar (2.) type in “reg”. The first option below the search area should be Registry Edit (3.).
Click on that now to open it up. You’ll then be asked if it’s okay to run the program. Tap OK and it’ll launch properly.
Step 2: Find the Attributes Settings
This next section isn’t as difficult as it looks. It’s just long more than anything.
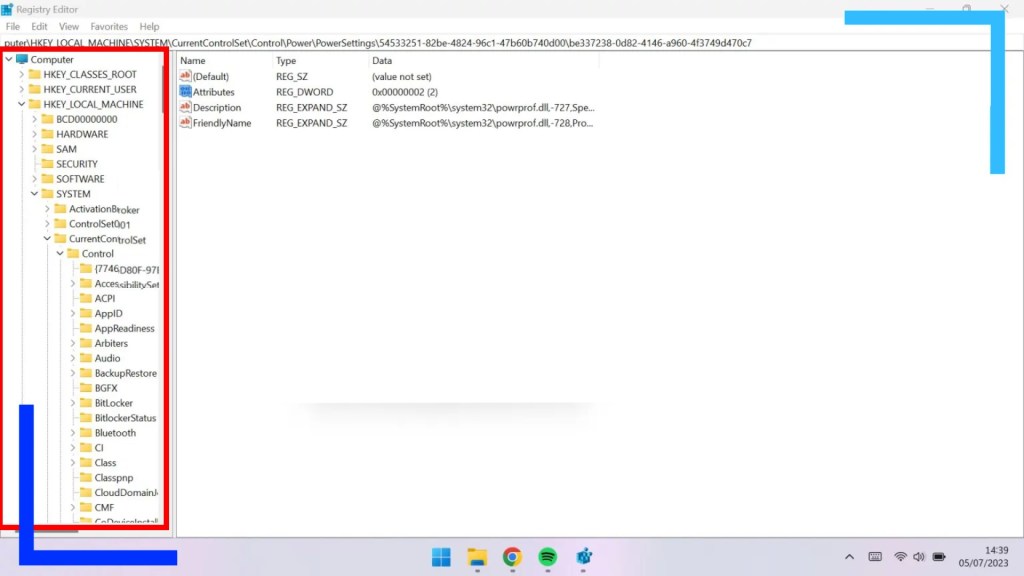
What we’re doing here is locating a specific folder with a specific setting inside. Start from Computer on the upper left of the window and work your way through the following path by clicking on the folders in this order:
Computer\HKEY_LOCAL_MACHINE\SYSTEM\CurrentControlSet\Control\Power\PowerSettings\54533251-82be-4824-96c1-47b60b740d00\be337238-0d82-4146-a960-4f3749d470c7
If you have trouble reading the above path, an easier way to read it and still be able to find what you need is to use the following path instead:
Computer > HKEY_LOCAL_MACHINE > SYSTEM > CurrentControlSet > Control > Power > PowerSettings> 54533 > be337
All I’ve done is shorten the final two folder names so you only need to remember the first few numbers or letters. When you find them, they’ll be the full version but you don’t need to worry about looking for a really long file name no one can remember.
Once inside the “be337” folder you should see a bunch of files, one of which is named “Attributes”.
Note: When I first did this I didn’t have the CurrentControlSet folder. If you find yourself missing anything, just skip ahead to the next part of the path. In my case, I didn’t have the CurrentControlSet folder, but I was able to go directly from System to Control in one go.
Once you’ve completed the next step, that missing folder should appear retroactively, if you’re missing one.
Step 3: Edit the Attribute

Click on Attributes with the right bumper to open it up.

Don’t worry about any of the other options here. Just focus on Value data and change it from 1 to 2. Next click on OK to save your changes.
What we’ve just done is edited the Registry so Windows will let us access a setting we normally can’t.
Step 4: Edit the Windows Power Plan

Go ahead and close Registry Edit and go back to the Windows icon (1.).
This time, type “Choose a Power” into the search bar (2.). One of the options below should now say “Choose a power plan”. Click on that once to open it up.

Before we get to editing anything, along the top of the window click on Power Options to go up a level.

You can change this for any of the power profiles, but I wouldn’t recommend it if you want to keep performance high. Instead, let’s click on Change plan settings to the right of the Turbo option.

We’ll now be back on the original screen we started on, but in the Turbo profile.
Below the main options is a blue clickable button titled Change advanced power settings. Click on that now.

There are a host of different options here, so don’t go messing with anything randomly. Stick to the guide and nothing should go wrong.
What we’re looking for is the section named Processor performance boost mode. Once found, click on that once and there should be the following two settings:
- On Battery: Aggressive.
- Plugged in: Aggressive.
Where it says Aggressive, you can click on that to change the setting. Click on both of the options and change them to the following:
- On Battery: Disabled.
- Plugged in: Disabled.
Click on OK to save your changes, reboot the ASUS ROG Ally, and the CPU boost is now deactivated.