
Joystick Tension Adjustment
Materials needed
- Phillips size 100 driver
- Plastic pry tool
- Small wire snips or scissors
- tweezers
- Optionally Washers
Notes:
- This shouldn't void your warranty provided you use aftermarket sticks and re-install your old ones. You can contact customer service for better clarification based on your country, laws, and what's allowed.
- The Red "warranty void" sticker on the battery and heat pipe does not void your warranty provided you do not damage anything inside of the device and restore it to a factory original condition before the RMA
- You will have three methods, Option 1 is to add a washer to the factory spring, Option 2 is to stretch the factory spring by 1/8" to add additional tension to it, and Option 3 you will replace the spring completely with a higher tension one.
- We ONLY RECOMMEND THIS MOD ON SPARE JOYSTICKS! You can buy additional joysticks with 14-day shipping here. These are a direct fit
- You will need to have very dexterous hands, these have extremely tiny parts internally and are VERY hard to re-assemble by hand. This mod is NOT for anyone easily frustrated or anyone who cant thread a needle, you have been warned.
- Be extremely careful when removing the back panel screws, and daughterboard screws as they can strip!
- BY FOLLOWING THIS GUIDE YOU TAKE RESPONSIBILITY FOR YOUR OWN ACTIONS
Instructions
- Remove back panel
- Unplug battery
- Remove ribbon cables from each daughter board
- Remove screws from each daughter board
- Unplug the haptics wires from the main board.
- Gently remove the Left and Right stick PCB
- Unplug the joystick ribbon cable from the daughter board
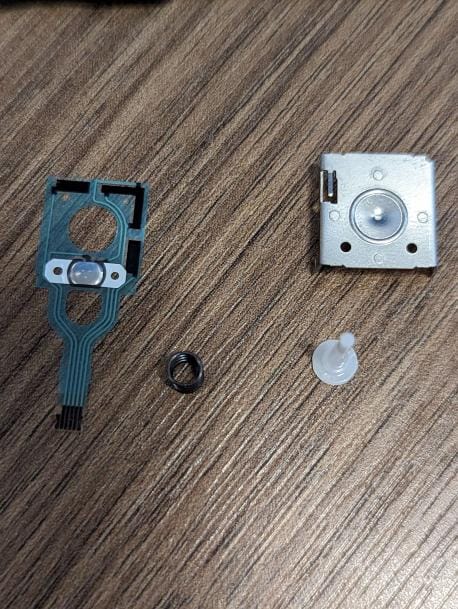
- Remove the two screws that hold down the hall stick
- Gently bend back all 4 tabs holding the stick base together.
- Use plyers or hold the joystick from the stem so its upside down
- Unclip the side tabs and lift off the metal bottom plate
- Remove the flex cable gently
- Remove the stem with spring
- Carefully set aside the joystick being careful not to dislodge anything.
The washer must sit flush with the stem bottom with zero gap!
Option 1: Adding a washer to the factory spring
- Add washer or replacement spring to stem
- The washer must not exceed the OD of the stem bottom or it will damage the flex ribbon layer
- The washer must sit flush with the stem bottom with zero gap!

Option 2: Stretching the factory spring
- Grab the first and last spring rung with your fingernails and gently pull, you'll feel it hit its max stretch and start to give.
- Pull in small amounts until the spring is (1/8 inch) or (3-4mm) longer than it was.
- Do not over-extend the spring as it will deform and break

Option 3: Replace the factory spring with an aftermarket one.

Reassembly
- Align the L3/R3 pop tab onto plastic pins
- Lay the flex ribbon down in the correct orientation
- From above push the bottom metal panel down onto the housing snapping it in place.
- Place on a flat surface and test that L3/R3 still works, if not dis assembly

- Your 4 tabs may break off during the reassembly process.
- If this occurs don't stress as its really only needed to keep the stick together when not screwed down.
- Just carefully screw the joystick to the daughter board and the tension will keep everything together correctly.
- Reassemble the assembly and bend the 4 tabs back into place.
- Repeat for both sides
- Reinstall the thumbstick cap and ensure that there's no play in it. (if there is now is a good time to apply the thumbstick wobble fix.
- Reinstall the left and right daughter boards back into the shell.
- Plug back in the haptics wires.
- Screw PCB's back in.
- Affix ribbon cables back.
- Plug the battery back in.
- Close the shell all the way (so the light sensor isn't tripped),
- Plug in the OEM charger, press and hold the power button, and release once the screen is on.
- Once on the Republic Of Gamers screen you must wait around 180 seconds for it to boot
- Test inputs with Gamepad tester to make sure everything is working correctly
- Screw case back together if everything is working correctly